How to Contribute to Blogs
This guide walks you through everything you need to write and publish a blog post on recode hive, heads-up for you there is a lot of steps, our idea is not about quantity, lets focus on quality on the article you write the best one will be eligible for GitHub Sponsorship.
- 📦 Node.js (v18 or later)
- 🔧 Git
- 💻 VS Code or your preferred editor
- Refer the welcome page to install and setup the repository in your local system. Check here
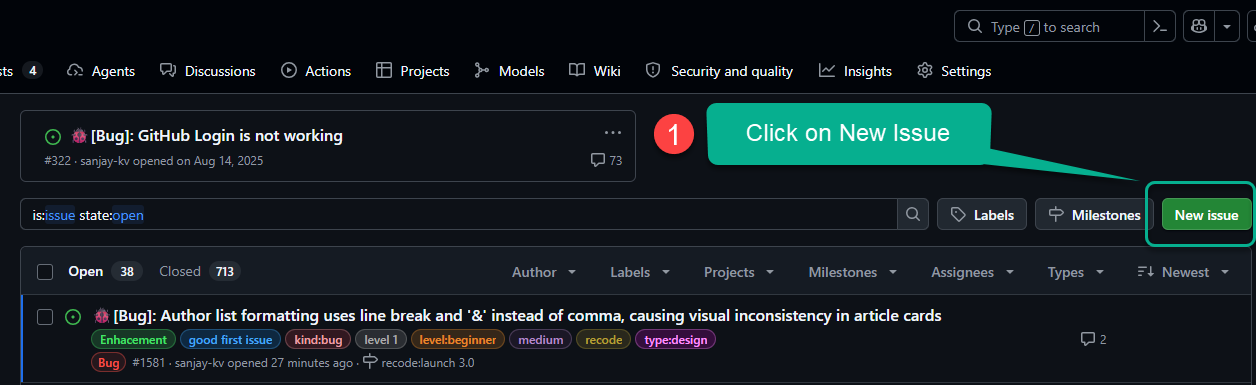
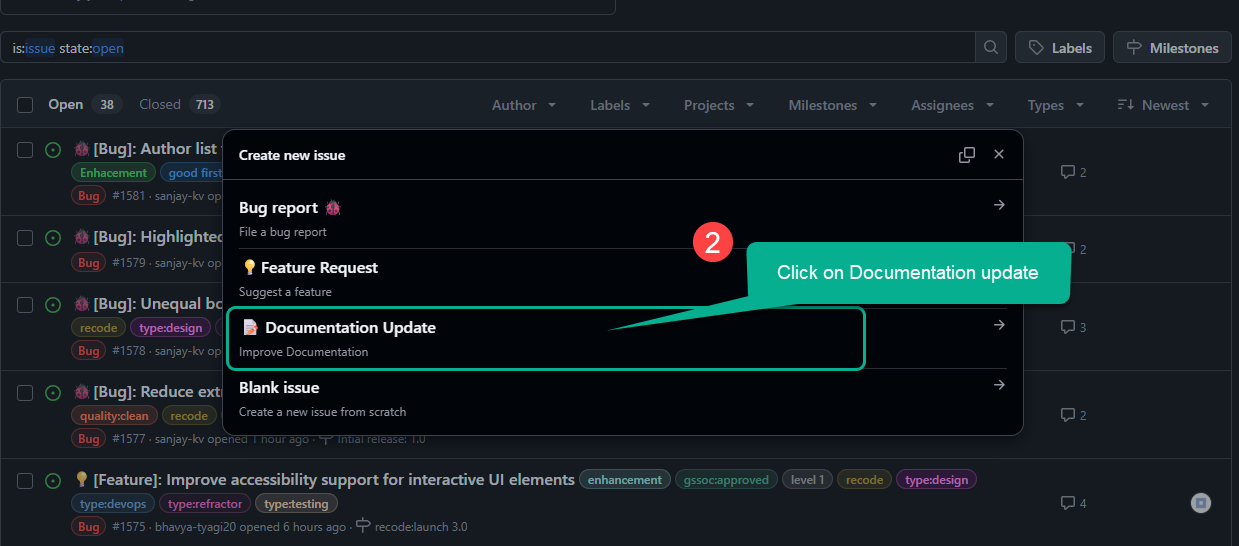
Step 1: Raise a New issue on GitHub
Head to the the GitHub issue on this repository, raise an new issue under documentation update.
- Few things to remember, don't raise random generic topics.
- Write from real experience, try to include real dashboard pictures, no copy paste articles.
- You can generate AI pictures, but need to be edited any tools like Canva.
- Your article must teach something offical documentation doesnot. Means no Intro to X or What is X.
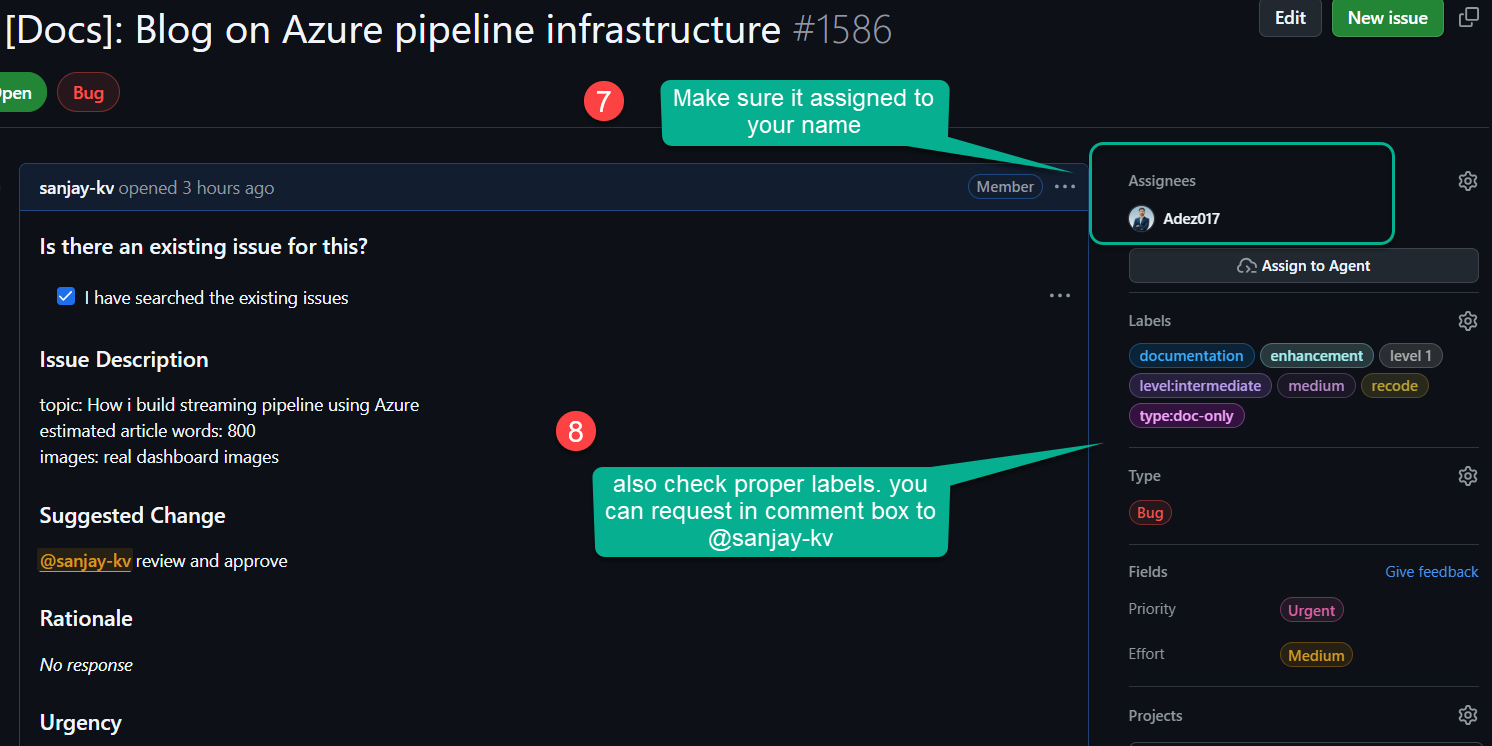
- Start working on Issue When its assigned to you by @sanjay-kv or any Maintainer. ref step 4.
- Step 1
- Step 2
- Step 3
- Step 4

Just follow the steps on forking the repositories and installing the dependencies on your local repository, if you dont know refer the steps 2 to 6 on welcome page.
Step 3: Create a New Branch
Never commit directly to main. Create a dedicated branch for your blog post: test
git checkout -b blog/your-blog-title
Use a short, descriptive name — for example blog/intro-to-docker or blog/react-hooks-guide.
Before starting any development, make sure your blog meets all of the following criteria. Your blog can be rejected if any requirement is not fulfilled:
-
- 5 backlinks to different external websites to support our documentation.
-
- 5 internal backlinks to other articles on recodehive.
-
- No generic content — avoid surface-level topics like "what is Azure" or "difference between X and Y". Write pure, high-depth technical articles with images. See this example for the standard we aim for. (Tip: tools like Snagit help produce great annotated screenshots.)
-
- Image filenames must be descriptive and SEO-friendly — no random names like
screenshot123.png.
- Image filenames must be descriptive and SEO-friendly — no random names like
-
- Content-to-code ratio: text should be more than code. Adsense flags pages at 60% code / 40% text - keep it the opposite. If code is long, link to GitHub and reference it in comments instead.
-
- Include a bulleted summary section at the top of the blog post.
-
- Include a FAQ section at the bottom.
-
- Use Docusaurus admonitions (
:::tip,:::info,:::note) for callouts, tips, and cautions (see formatting guidelines below).
- Use Docusaurus admonitions (
-
- Tables must be center-aligned - wrap them in an
:::infoblock to achieve this in Docusaurus.
- Tables must be center-aligned - wrap them in an
-
- Use named code blocks with a filename label when showing code (e.g.,
```java title="Sample.java").
- Use named code blocks with a filename label when showing code (e.g.,
-
- When showing a query and its output together, use a Tabs block with separate "Query" and "Output" tabs.
-
- Screenshots must follow the naming convention and size guidelines below.
Step 4: Create the Blog Folder and File
All blog posts live inside the blog/ directory. Each post gets its own folder.
Folder structure:
blog/
└── your-blog-title/
    ├── index.md          ← your blog content
    └── images/           ← screenshots and images (optional)
        ├── cover.png
        └── step-01.png
Create the folder and file:
mkdir -p blog/your-blog-title/images
touch blog/your-blog-title/index.md
Step 5: Write the Frontmatter
Open blog/your-blog-title/index.md and add the following frontmatter at the very top of the file:
---
title: "Your Blog Post Title"
authors: [your-author-id]
sidebar_label: "Your Blog Post Title"
tags: [tag1, tag2, tag3]
date: 2026-04-30

description: A one or two sentence summary of what this blog post covers.

draft: false
canonical_url:
---
| Field | Description |
|---|---|
title | The full title displayed at the top of the post and in search results |
authors | Your author ID from blog/authors.yml (see Step 6) |
sidebar_label | Short label shown in navigation sidebars |
tags | Comma-separated list of relevant topic tags |
date | Publication date in YYYY-MM-DD format |
description | SEO meta description (keep under 160 characters) |
draft | Set to true to hide the post; false to publish |
canonical_url | Leave blank unless cross-posting from another site |
Step 6: Register Yourself as an Author
Open blog/authors.yml and add an entry for yourself if you are not already listed:
your-author-id:
  name: Your Full Name
  title: Your Role or Title
  url: https://github.com/your-username
  image_url: https://avatars.githubusercontent.com/u/YOUR_GITHUB_USER_ID?v=4
  page: true
  description: >
    A short bio about yourself (2–3 sentences).
  socials:
    github: your-username
    linkedin: your-linkedin-handle   # optional
    x: your-twitter-handle           # optional
The your-author-id value must exactly match what you put in the authors field of your frontmatter.
Step 7: Write Your Blog Content
After the closing --- of your frontmatter, add the <!-- truncate --> comment. Everything above this comment becomes the preview shown on the blog listing page; everything below is the full post.
---
...frontmatter...
---

<!-- truncate -->

Your introduction paragraph goes here. This will appear as the preview on the blog index page.

## Section Heading

Body content continues here...
Formatting Guidelines
Use ## and ### headings to structure your content.
Bulleted Summary Section (Required)
Every blog must begin with a bulleted summary right after the intro paragraph. This helps readers quickly understand what they'll learn.
**What you'll learn in this post:**
- How to set up X from scratch
- How to configure Y for production
- Common pitfalls and how to avoid them
Named Code Blocks (Required)
Always label code blocks with a filename so readers know exactly what file they are editing:
```java title="Sample.java"
public class Hello {
    public static void main(String[] args) {
        System.out.println("Hello, world!");
    }
}
```
Query + Output: Use Tabs (Required)
When showing a database query alongside its output, use a Tabs block so both fit in a single window.
First, import the components at the top of your index.md (after frontmatter, before any content):
import Tabs from '@theme/Tabs';
import TabItem from '@theme/TabItem';
Then structure your query + output like this:
<Tabs>
  <TabItem value="Query">

  ```sql
  -- Create the table
  CREATE TABLE friends (
    id INT PRIMARY KEY,
    name VARCHAR(100),
    username VARCHAR(100)
  );

  -- Insert data
  INSERT INTO friends (id, name, username) VALUES
  (1, 'John Doe', 'johndoe'),
  (2, 'Jane Smith', 'janesmith'),
  (3, 'Bob Johnson', 'bobjohnson');
  ```

  </TabItem>
  <TabItem value="Output">

  | id | name        | username    |
  |----|-------------|-------------|
  | 1  | John Doe    | johndoe     |
  | 2  | Jane Smith  | janesmith   |
  | 3  | Bob Johnson | bobjohnson  |

  </TabItem>
</Tabs>
You can add as many <TabItem> tabs as needed — for example separate tabs per subquery type, or one tab per language variant.
Admonitions: Tips, Notes, Info, and Cautions
Use Docusaurus admonitions to highlight important information. Don't overuse them — only where they add real value.
For tips and helpful extras:
:::tip[Need Git Commands?]
Check out our [comprehensive Git Commands Cheatsheet](../GitHub/setup-environment/git-commands.md)
with 50 essential Git commands and examples.
:::
For extra context or caution:
:::info
In the picture below, Developer 1 handles the men's shopping section, Developer 2
deals with the women's section, and Developer 3 works on the login feature.
:::
For key feature callouts:
:::note
Key Features of GitLab:
- GitLab provides **built-in CI/CD pipelines**.
- Unlike GitHub, GitLab can be **self-hosted** or used on the cloud (GitLab.com).
- GitLab offers [Premium Plans](https://about.gitlab.com/pricing/) with advanced CI/CD and security features.
:::
Tables: Center Alignment via :::info
Plain Markdown tables are left-aligned by default in Docusaurus. Wrap your table in an :::info block to center it:
:::

| Command     | Description       |
|-------------|-------------------|
| `git init`  | Initialize a repo |
| `git clone` | Clone a repo      |

:::
Rendered Output
| Command | Description |
|---|---|
git init | Initialize a repo |
git clone | Clone a repo |
FAQ Section (Required)
Every blog post must end with a FAQ section before the conclusion. Use questions your readers are likely to have:
## Frequently Asked Questions

**Q: Do I need to know X before starting this guide?**
A: Basic familiarity with Y is helpful, but the guide covers everything step by step.

**Q: Will this work on Windows?**
A: Yes, the steps are cross-platform. Windows-specific commands are noted where they differ.
Step 8: Add Screenshots and Images
Recommended Screenshot Dimensions
| Use Case | Recommended Size |
|---|---|
| Cover / hero image | 1200 × 630 px (16:9 ratio, also ideal for social sharing) |
| Full-width step screenshots | 1280 × 720 px or 1280 × 800 px |
| UI close-ups / partial screenshots | 800 × 450 px |
| Maximum file size | 500 KB per image (compress with Squoosh or TinyPNG) |
Use PNG for UI screenshots (crisp text) and JPEG/WebP for photos.
Naming Convention
Use lowercase, hyphen-separated, numbered filenames so they sort correctly and are SEO-friendly. Never use random or auto-generated names.
images/
├── cover.png
├── 01-open-settings.png
├── 02-navigate-to-plugins.png
└── 03-final-result.png
Embedding Images in Markdown
Reference images relative to index.md:

Always write descriptive alt text — it improves accessibility and SEO.
Tools like Snagit make it easy to produce annotated, professional-quality screenshots. See this article as a reference for the image quality standard we aim for.
Step 9: Update the Database
All blog data is linked in the database folder (\database\blogs\index.tsx). Update it with the following details:
{
  id: sequence_wise,
  title: "Title of the post",
  image: "relative path of the cover image for the blog post",
  description: "A short (2-3) lines of description of the post",
  slug: "The name of the blog folder (keep it exact)",
  authors: ["your-author-id"],
  category: "The category the blog belongs to",
  tags: ["tags or topics the blog is related to (tools or technologies)"],
}
All details are necessary for correctly rendering the blog card on the blogs page. Take a close look and make sure everything is filled in.
Step 10: Preview Your Post
Make sure your dev server is still running (npm start), then navigate to http://localhost:3000/blog to see your post in the listing and click into it to read the full content. Verify:
- The frontmatter title, date, and author show correctly.
- The truncate preview looks right on the blog index.
- The bulleted summary section appears near the top.
- All images load and are properly sized.
- Code blocks are syntax-highlighted and have filename labels.
- Query/output pairs use Tabs.
- Tables are center-aligned inside
:::infoblocks. - Tips and notes use the correct admonition type.
- The FAQ section is present at the bottom.
Step 11: Commit and Push Your Changes
Once you are happy with the preview, stage and commit your files:
git add blog/your-blog-title/
git add blog/authors.yml          # only if you added yourself
git commit -m "blog: add post on your-blog-title"
Push the branch to your fork:
git push origin blog/your-blog-title
Step 12: Open a Pull Request
-
- Go to your fork on GitHub — you will see a "Compare & pull request" banner. Click it.
-
- Set the base repository to
recodehive/recode-websiteand base branch tomain.
- Set the base repository to
-
- Write a clear PR title, e.g.
blog: Add post on Your Blog Title.
- Write a clear PR title, e.g.
-
- In the description, briefly summarize what the post covers.
-
- Click Create pull request.
A maintainer will review and merge your post. You may be asked to make small edits before it is approved.
Keeping Your Fork Up to Date
Before starting a new post, pull the latest changes from upstream to avoid merge conflicts:
git checkout main
git fetch upstream
git merge upstream/main
git push origin main
Quick Reference Checklist
Before submitting your PR, go through this checklist:
-
- Blog folder created at
blog/your-blog-title/index.md
- Blog folder created at
-
- Frontmatter is complete (title, authors, tags, date, description, draft: false)
-
- Author entry exists in
blog/authors.yml
- Author entry exists in
-
-
<!-- truncate -->comment placed after the intro paragraph
-
-
- Bulleted summary section included near the top of the post
-
- FAQ section included at the bottom of the post
-
- No generic content — article is high-depth and technical with images
-
- 5 external backlinks to supporting websites
-
- 5 internal backlinks to other recodehive articles
-
- Text is more than code — long code blocks link to GitHub instead
-
- Code blocks use filename labels — e.g., opening fence followed by
python title="app.py"
- Code blocks use filename labels — e.g., opening fence followed by
-
- Query + output pairs use Tabs blocks
-
- Tables are wrapped in
:::infofor center alignment
- Tables are wrapped in
-
- Tips, notes, and cautions use the correct Docusaurus admonition
-
- All images are in
blog/your-blog-title/images/with SEO-friendly names
- All images are in
-
- Cover image is 1200 × 630 px; step screenshots are no wider than 1280 px
-
- Image file sizes are under 500 KB each
-
- Post previews correctly at
localhost:3000/blog
- Post previews correctly at
-
- Database entry added in
\database\blogs\index.tsx
- Database entry added in
-
- Committed on a feature branch (not
main)
- Committed on a feature branch (not
-
- Pull request targets
recodehive/recode-websitemainbranch
- Pull request targets